
Reloading Page
Last Updated: 07/15/2015
On This Page

Reloading
Page
Last
Updated:
07/15/2015
On This Page
![]()

Some Finer
Points on Handloading/Reloading
Nit-picking and improving accuracy by careful case
preparation.
CASE PREPARATION.... A few years ago, you could shrink your groups 1/4" by just subscribing to Precision Shooting Magazine. In those days, there were good articles on precision reloading in each issue. The magazine is now discontinued. On each of the aspects I have listed below, there would be complete articles and much discussion. The words Handloading and Reloading have the same meaning and are interchangeable.
![]() FIRST
PERSON....
FIRST
PERSON.... ![]() This page is, for the most part, written
in the first person, because it is about what I do in reloading.
I have tried to bring up the major operations and the critical
points to achieve maximum accuracy and also briefly explain why I
do each step. For each of the operations that I write about,
there are probably better ways, but the best way I have found is
described here. These case preparation steps are not done on
factory ammunition and, in doing these steps, I believe my
reloads are a cut above merely assembling quality components. If
you have a better procedure for one or more of these operations,
please tell me about it. I am always open for improvements. I do
not discuss or recommend procedures or hardware that I have not
personally used. I refuse to speculate on things where I have no
first hand experience. Thanks for viewing my page and good
reading from Varmint Al.
This page is, for the most part, written
in the first person, because it is about what I do in reloading.
I have tried to bring up the major operations and the critical
points to achieve maximum accuracy and also briefly explain why I
do each step. For each of the operations that I write about,
there are probably better ways, but the best way I have found is
described here. These case preparation steps are not done on
factory ammunition and, in doing these steps, I believe my
reloads are a cut above merely assembling quality components. If
you have a better procedure for one or more of these operations,
please tell me about it. I am always open for improvements. I do
not discuss or recommend procedures or hardware that I have not
personally used. I refuse to speculate on things where I have no
first hand experience. Thanks for viewing my page and good
reading from Varmint Al.
BEGINNING RELOADING.... I am not qualified to
discuss the latest beginner's reloading packages available on the
market. I only discuss equipment and techniques where I have
firsthand experience. My reloading equipment was purchased for
accuracy reloading and not necessarily for economy. My reloading
press is an RCBS Rockchucker. I purchased a number of presses on
the road to ending up with the Rockchucker. The beginner can save
a lot of money in the long run by buying a good press to start
with instead of upgrading. There are good web pages on beginning
reloading. Click on John's Varmint Den and go to his reloading
page.
PRIMER POCKET.... I use the Whitetail Design's carbide primer pocket tool. The tool is expensive, but will last a lifetime if you don't drop it and break it. On new brass, this tool will cut the primer pocket to the correct depth and remove the fillet radius at the base of the pocket. This cutting process only needs to be done once to new cases. For each reloading, the primer pocket can quickly be cleaned with the same tool. If your loads are hot, you will be able to cut metal at the base of the primer pocket after each firing. This is an indication that you are yielding the brass case head and setting back the base of the primer pocket slightly. When you clean the primer pocket this way, you will get a better "feel" when seating the primers (no variable fillet at the base of the primer pocket), and you will not be shooting extra primer residue down your nice shiny barrel. Note: Dick Wright, the former "Mr. Whitetail", who made my Whitetail Design's carbide primer pocket tools, has gone out of business but designated Russ Haydon's Shooters' Supply (now closed) as his successor for the primer pocket uniformer tools. They sell his original knurled handle style as well as the same cutters (Large Rifle, Small Rifle or Lapua) alone or in the screwdriver handle, which is the Haydon-style.
FLASH HOLE BURR.... When the brass is formed and they punch out the flash hole, a tiny raised burr is left around the edge of the flash hole where it enters the inside of the case. The theory is that this burr could cause variable ignition from round to round depending on its size and location. The K&M's Internal Flash Hole Deburring Tool is simply a tiny center drill in a mandrel that it will make a cut with a limited depth. A couple of turns on each new case is all that is needed to remove the burrs and make all of the flash holes uniform. It sounds like a good thing to do and I perform this operation on all of my brass.
CASE LENGTH TRIMMING.... For really good accuracy, you need to have all of your case neck ends cut square. If one side of the neck is longer than the other, it would tend to tip the base of the bullet to the side as it exits the neck. Also, excessive case neck length can force the end of the case neck into the end of the chamber and "clamp" the bullet in the neck. The extra force to start the bullet in motion can cause excessive pressure with an otherwise safe round. I did use an RCBS case trimmer, but now use my Mini Lathe with a dial indicator. If you cut your case lengths too short, there is a large unsupported gap that the bullet passes by that does nothing for accuracy. I like to keep this gap approximately 0.010" to 0.015" in factory chambers and 0.005" for my "fitted neck" cases in custom chambers. This is explained in detail below.
MEASURE THE CHAMBER LENGTH.... Here is another accuracy aid. I purchased the Sinclair case length measuring plugs for .17, .224, and 6mm calibers. These are very simple steel cylinders turned to the bullet diameter, leaving a rim slightly less than the case neck OD. To use, you merely drill through the primer pocket (so you can later push the plug out) on an expendable cartridge case and neck size it. Trim the case length about 0.100 inch short so the case mouth will not touch the rim of the plug gauge. Insert the Sinclair plug gauge as if it were a bullet, leaving it long and then chamber the case. The plug will be pushed deeper into the case neck and when you extract it, you can measure the chamber's actual length with a dial caliper. I usually find that the factory recommendations for case length leave a 0.050 inch to 0.070 inch gap between the end of the case and the actual length of the chamber. This is a factory safety concern and you can get high pressures by forcing a long case into a short chamber. The factory wants to be on the safe side. But like everything else, if you want the best accuracy, you can minimize this gap down to 0.005 inch and still be safe. You will get better accuracy and find that you can use much longer necks, in most cases, than the factory recommendations specify. The extra case length will better allow you to load the bullet farther out to touch the lands. I have found that, typically, factory .243 Win brass, is already 0.050 inch too short and there is no way that I can think of to lengthen it. I don't trim to the lengths specified in the loading manuals, but use my measurements as a guide. All of this sounds like a lot of trouble to go through compared to walking into a store and asking for a box of 30-30's, but it makes a big difference in the confidence level of your accuracy potential. If you have a lathe, the dimensions of the plug gauges are given for a few rifle calibers on my Mini Lathe Page. They are very easy to make. Check out Fred's page for more info on making tight-neck and long-neck brass.
POOR MAN'S GAUGE.... You can make a "Poor Man's" gauge to measure how long your chamber is. You will have to sacrifice a piece of brass. Take a FL-sized piece of brass and drill out the primer pocket with a 1/4" drill. This is so you will later be able to push the bullet out if you need to. Cut half of the neck off with a hacksaw. Make a careful cut and save the piece you saw off. De-burr and chamfer the new neck opening of the piece of brass and the tiny piece you cut off. Slit the piece you cut off so it will slide on a bullet with a few pounds of force. Seat a bullet into the case and chamber the round to make sure the bullet is not seated farther by the lands. Remove the cartridge case with the seated bullet and slip the tiny brass split ring over the bullet and chamber it again. Your chamber will slide the piece of brass ring back down the bullet when it hits the end of the chamber. Carefully remove the cartridge case and measure. Measure the length from the base of the cartridge case to the top of the tiny ring. That is your actual chamber length. You might want to do this a couple of times to be sure of the measurement.
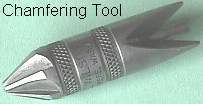
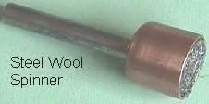
NECK MOUTH CHAMFERING.... After you trim the case lengths, there will be a burr on the ID and OD of the case mouth. I use one of the standard inside/outside neck-chamfering tools and make a very light cut on both the inside and outside. I just want to barely break the sharp corner. I don't want to sharpen the end, like I would need to make a cookie cutter. After these two light cuts, I smooth the case mouth with very fine steel wool, using the Steel Wool Spinner below. If you look with a magnifying glass, what the steel wool smoothing process does is remove all the tiny burrs on the chamfer cuts at the case mouth. It does not polish the neck OD or ID. This smooth mouth is a very important step to make seating the bullets easier and smoother without scratching the bullet. The smooth case mouth also helps to prevent the Moly Coating from being scraped off when the bullets are seated. Link: All about steel wool.
![]() Dick
Hatfield made me a very simple Steel Wool Spinner that is a
1/4-inch diameter steel rod, 2 inches long, hard soldered to a
3/4-inch copper cap (solder-type pipe fitting). I place a wad of
steel wool inside the copper cap and use the drill motor (I now
use the Mini Lathe) to spin it and push the mouth of the case
into the steel wool for approximately 10 turns. It works great
and the case mouths are very smooth and burr free after this
process.
Dick
Hatfield made me a very simple Steel Wool Spinner that is a
1/4-inch diameter steel rod, 2 inches long, hard soldered to a
3/4-inch copper cap (solder-type pipe fitting). I place a wad of
steel wool inside the copper cap and use the drill motor (I now
use the Mini Lathe) to spin it and push the mouth of the case
into the steel wool for approximately 10 turns. It works great
and the case mouths are very smooth and burr free after this
process.
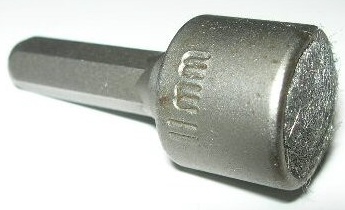
An off-the-shelf nut setter for a power screwdriver works very well to hold the
steel wool for smoothing the neck mouths.
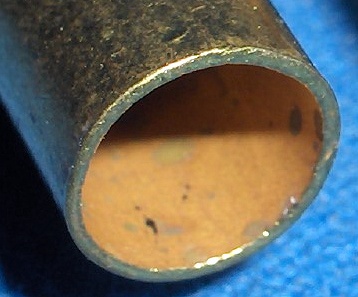
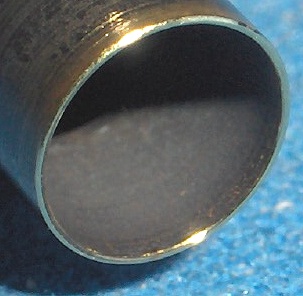
NECK MOUTH.... On the left is a brand new 243 Win brass and you can see
the rolled over edges of the mouth do to the hammering that occurs in the
polishing process. Also the hammered area is work hardened and locally, is no
longer in the annealed state. If you have ever noticed a tiny ring of gilding
metal scraped off when you seat a bullet, it is this hard rolled over ring of
brass that does the scraping. Even after inside and outside chamfering, there is
still a burr left at the edge of the cut surface.
On the right is one of my 23/40 brass cases after the neck has been trimmed
square and fired a number of times. I gave it about 30 revolutions in the Steel
Wool Spinner to show how smooth the neck mouth is. With the smooth annealed neck
and no rolled over burr, bullets seat very smoothly without scraping gilding
metal of the bullet.
POLISHING BRASS.... Smooth and uniform case mouths are very important in producing accurate reloads. Therefore, I don't polish my carefully prepared brass in a tumbler. During polishing, the case mouths are hammered against the other cases in the tumbler. The hammering rolls over a small lip or burr on the ID and OD of each case mouth. This peening process also locally work hardens the brass. These tiny rolled-over rings of brass at the case mouths are harder than the rest of the annealed neck. These rings and tiny peen marks are very obvious on new brass. If you look at your nice shiny cleaned cases out of the tumbler, you will see the battered case mouths! I have heard that some people tumble their loaded ammo to clean it and, with a bullet in place, the case mouths would be protected from the hammering. I haven't tried it. CAUTION: There is a serious problem with tumbling loaded ammo. The coating on the powder grains, that controls the burn rate, could be abraded and this would change the powder's characteristics. If you were loading ammo near maximum, after tumbling, you might have created a dangerous pressure problem. I merely wipe each of my reloads clean with a cloth towel to remove all of the grease and dirt. For my "fitted neck" cases, I polish the neck OD and shoulder with a "Krazy" brand polishing cloth (any silver or brass polishing cloth would work) or a bit of Flitz Metal Polish on a cloth before each reload. I swab out the neck ID with a cotton cleaning swab to remove the carbon and dirt. Keeping that case mouth smooth can't be over stressed.
FORGET NICKEL-PLATED BRASS.... I liked the looks and feel of nickel-plated cases, but I don't load them anymore and here is why. The cases are strong and it is easy enough to outside neck turn them. That is not the problem. The nickel-plating on the case neck ID is like sandpaper. The only way you might be able to remove this grit is with a case neck ID reamer if you have a "tight neck" chamber and enough neck wall thickness to work with. If you have a loaded nickel-plated round laying around and don't believe me, just pull the bullet. It will look like you pulled it out of a tube of 180 grit wet/dry sandpaper. If you pull the bullet out of a brass case mouth that has been carefully chamfered and polished with the steel wool spinner process above, it will be essentially smooth like out of the bullet box. Want copper in the barrel? Start by sanding the surface of those nice polished precision bullets. Try it with a Moly Coated bullet and it is even worse; the nickel-plated cases scrape off the Moly. The nickel-plated case neck IDs don't get any better after you reload them a few times. They are still like sandpaper. Think about a few of those nickel pieces of grit imbedding into the copper of the bullet and what they do to your rifle barrel! I have heard that the nickel is hard enough to score some reloading dies and also wear down the expander ball. Any metal that hard, should be kept away from your precision barrel. I have heard that some people have had success in removing the nickel plate from the neck IDs with a stainless steel brush and a drill motor. I haven't tried it.
MORE ABOUT NICKEL PLATING.... This is interesting about
the mechanical properties of the nickel
plating:
Electrolysis nickel plating is a process for chemically applying
nickel-alloy deposits onto metallic substrates using an auto
catalytic immersion process without the use of electrical
current. ...snip....
Hardness and Wear Resistance
One of the most important
properties for many applications is hardness. As deposited, the
micro-hardness of electrolysis nickel coatings is about 500 to 700
HK100. That is approximately equal to 45 to 58 HRC and equivalent
to many hardened alloy steels. Heat treatment causes these alloys
to precipitation harden and can produce hardness values as high
as 1100 HK100, equal to most commercial hard chromium coatings.
...snip...
Note that if you anneal your nickel plated necks, you are
hardening the nickel plating. It can be harder than many alloyed
steels before you anneal and can increase is hardness as much as
2 fold by precipitation hardening. I sure wouldn't want those
tiny little hard pieces inside the neck getting embedded in the
bullet's copper surface and then fire lapping my nice shiny
barrel.
![]() OUTSIDE CASE NECK TURNING.... I started
to get true accuracy when I began using the Marquart outside neck
turning tool to true up my cartridge case necks. It looks like
the Marquart Neck Turning Tool for under $50 is now being
manufactured by a different company. They claim the same design,
precision, and quality for 21 years. I have not tried a Marquart
tool from the new company, but the info is given below.
OUTSIDE CASE NECK TURNING.... I started
to get true accuracy when I began using the Marquart outside neck
turning tool to true up my cartridge case necks. It looks like
the Marquart Neck Turning Tool for under $50 is now being
manufactured by a different company. They claim the same design,
precision, and quality for 21 years. I have not tried a Marquart
tool from the new company, but the info is given below.
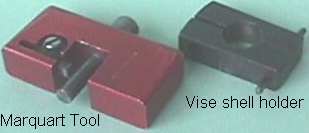 |
Morrison Precision L.L.C. 6719 Calle Mango Hereford, AZ 85615 520-378-6207 morprec@c2i2.com |
If you can't find a Marquart Tool, the K&M or Sinclair neck turning tools are probably just as good, but I haven't personally tried them. Here is the info to get the K&M Neck Turning Tool directly from the manufacturer:
K&M Services
5430 Salmon Run Rd.
Dover, PA 17315
717-292-3175
Neck turning provides a neck with uniform wall thickness, helps to center the bullet on the bore axis, and reduces split necks. Neck turning also sorts out the cases that have large variations in wall thickness because, once turned, the poorer cases are easily identified and can be tossed into the bone pile.
NECK TURNING FOR FACTORY-CHAMBERED RIFLES.... Here is how I adjust the neck turning tool for my factory-chambered rifles that usually have a sloppy 0.010 inch of neck clearance. I pick out 10 new cases at random. Then, as I always do even with new cases, neck size them, including the expander plug, so the neck ID will be round and tight on the neck turning mandrel. I also lightly chamfer the ID and OD of the neck mouth to remove the "rolled over edge" from factory case polishing. The mandrel needs to turn hard inside the case neck even when there is no cutting action. A tight fitting mandrel is the only way you can really make accurate cuts. I adjust the depth of cut so it barely cuts any material and then go through all 10 cases. Usually, there will be one or two cases that clean up practically all the way around and a few that cut heavily only on one side. I increase the depth of the cut a slight amount and go through the 10 cases again. I continue this process until about 75% of the cases clean up about 80% to 90% of the neck outside surface. Caution: Do not set your neck turning tool so it makes a clean cut on all of the cases, because it will make the necks too thin and you will have ruined all of the cases. Therefore, with the correct setting, it means I will reject 2 or 3 out of 10 cases to the bone pile. I have found that Winchester brass usually has thicker necks than Remington brass and appears to last longer. I keep that setting on the neck turning tool and turn all the cases in that lot of brass. No more neck turning is required for the life of these cases. The neck turned cases will improve accuracy by decreasing the group sizes approximately 50% and get rid of most of the wild fliers. Another advantage of neck turned cases is the reduction of split necks. The uniform wall thickness causes uniform stretching of the neck wall during firing and uniform compression during neck resizing.
NECK TURNING FOR CUSTOM-CHAMBERED RIFLES.... For my rifles with tight-necked custom chambers, I use "fitted neck" cases. Once made, these "fitted neck" cases need no resizing. All that is required for reloading is to clean the primer pocket, clean the neck ID, reprime, throw the powder charge, and seat the bullet. These rifles have chamber neck diameters so small that I can't close the bolt on factory ammunition. It took a while to figure out how to reliably make "fitted neck" cases and it cost me quite a few good pieces of brass in the learning process. The first step is to turn the necks on 3 or 4 sacrificial cases so that there is approximately 0.005 inch of neck clearance with a bullet seated. Load a standard load and fire-form these cases. Carefully measure the neck diameter of these fired cases and record this diameter. I call it the "spring back" diameter. This diameter is actually the diameter the brass neck will spring back from elastically after being forced against the rifle chamber's neck diameter, including the elastic expansion of the chamber itself. The difference between the barrel's chamber neck diameter and this fire-formed case neck's "spring back" diameter is usually about 0.0013 inch to 0.0015 inch. This spring back is for the .224 to .243 calibers.
NECK TURNING FOR TIGHT NECK CHAMBERS.... Instead of using tight neck clearance of the "fitted neck" procedure above, most people neck turn their brass for custom chambers so there is a neck diameter clearance of 0.003 inch to 0.004 inch. Often standard factory dies will not be able to resize the necks and the Redding bushing dies, or equivalent, are required to neck size to the proper diameter without an expander ball.
FITTED NECK CASES.... Continuing on, I take another 4 or 5 cases and adjust the neck turning tool so that the neck diameter (with the bullet seated) is the same or 0.0001 inch larger than the "spring back" diameter above. This is a cut and try process and takes some very careful adjustments on the neck turning tool. After the neck turning tool is adjusted correctly, I load and fire the 5 cases and neck size them and repeat the neck turning without changing the setting on the Marquart tool. This final neck turning will usually take a slight skimming cut of less than 0.0001 inch. I load the 5 cases again without doing any resizing and fire them and then clean the neck IDs with a brush and load them. I feel the neck tension by the force it takes to seat the bullet. If there is ample neck tension so that I can not pull the bullet out or seat it deeper with my fingers, I have the correct neck turning setting. I make no further adjustments to the neck turning tool. At this point I turn all the cases in the lot without changing the turning tool setting. I fire-form the cases, neck size them, and take the final skimming cut. At this point, I have "fitted neck" cases for this particular custom-chambered rifle. These cases give me the optimum in accuracy and I never have to resize them again. If they start to get the least bit sticky in the chamber (hard to open or close the bolt), I reduce the load and check for accuracy. The cases should last indefinitely, since, after the first firing, they are only exposed to elastic stress levels. Most cartridge cases have a limited life because of high stress levels and the plastic deformations of the brass during firing and resizing. I have given up shooting maximum loads. They burn out the barrels and don't give me the reliable accuracy I require when the cross hair is on a critical target.
TURN TO THE SHOULDER.... I have very carefully dressed the tool bit with a fine diamond hone so that the cut on the outside of the neck looks like polished brass. I also made a small fillet radius (approximately 0.010" radius) on the leading edge of the tool bit that matches the fillet at the neck to shoulder junction on new brass. I turn the neck so that the bit cuts slightly into the shoulder approximately 0.002" to 0.004". I have had no necks separate from the shoulder from doing this and it decreases the chance of developing the "dreaded doughnut" (a constriction of the neck ID at the neck to shoulder junction).
HOT TOOL.... Here are some other points of interest on the Marquart neck turning tool. Before I start neck turning or after a delay, I put the Marquart tool in my pocket for 5 or 10 minutes to warm it to body temperature. Because of the differences in thermal expansion between the aluminum and steel of the turning tool, the cold tool will cut about 0.0001 inch deeper than when it is at body temperature! Once warm, it stays warm from my hands and neck friction as I use it. I use a mixture of Butter Flavored Crisco and Teflon Super Lube grease on the mandrel to prevent it from galling inside the case neck. I have finally purchased tungsten carbide mandrels for .17, .224, and 6mm and these really minimize galling of the brass. You can minimize galling with the steel mandrels by polishing them with Flitz Metal Polish. Once the brass does gall on a steel mandrel, you have to stop using it and clean it in Sweet's 7.62 to get all the brass off and re-polish.
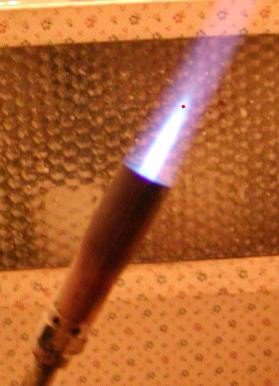
ANNEALING CASE NECKS.... After 5 to 10 loadings for factory-chambered rifles and the associated neck sizing, the case necks are strain hardened due to the cold working of the brass. Eventually, if you don't anneal, you will start to get split necks. Also, after wildcat case forming from one neck size to another, the necks and shoulders will be hardened. The necks may be easily annealed to remove the high residual stresses and restore the desired low yield stress and desired annealed (yield stress of 19,000 psi) condition. Here is how I anneal case necks. I use a Propane Torch that I got at the hardware store. I stand it up on a table and adjust the flame until the inner blue cone flame tip is about 1 inch long. I make a case spinner out of a bamboo shish kebab stick. I cut a piece about 4 inches long and whittle down about 3/8 inch of one end so it will easily fit in the flash hole and slip a small hex nut over the end for a stop. I put some tape or glue behind the nut to hold it in place. I fill a big bowl with cold water. I do the annealing in a black dark place, like at night with the lights off or in a dark room with the door closed and no windows. I put the stick through the flash hole and, holding the stick, spin the case mouth in the flame while holding the center of the neck right at the tip of the blue center cone of the flame (at the location of the red dot in the picture). When the neck just becomes a visible dull red (about 750°F), I drop the case in the bowl of water. The neck and most of the shoulder are now stress free in an annealed condition and my case neck is in the "like new" condition. Do not anneal the necks in a lighted room. You won't be able to detect the dull red color and by the time you see red, the brass is already too hot. This burns out the zinc, ruining the brass. Caution: Do not anneal any other part of the case. An annealed case head does not have enough strength to support the high gas pressures and would probably rupture. After annealing, I put the cases in a bowl and dry them with a hair drier. Don't get them so hot that you can't pick them up. I blow dry them and wait 30 minutes or so and give them another blow dry. If you are more patient, you can let them air dry overnight.
ANNEALING AND NECK TENSION.... Uniform neck tension is another reason to anneal your case necks. Each time you neck size and then the expander ball opens the neck up to the correct diameter, the brass' yield strength increases. It is called strain hardening. As the yield stress increases, there is more spring-back (to a smaller neck ID) after the expander ball opens up the neck. This effect increases the neck tension. A new annealed neck will have less neck tension than a case that has been fired and neck sized a number of times. Cartridge brass is 70% copper and 30% zinc and its yield stress and strength is increased by cold working.
Annealed cartridge brass has a yield stress of 19,000 psi.
¼ hard cartridge brass has a yield stress of 40,000 psi.
½ hard cartridge brass has a yield stress of 52,000 psi.
So the neck tension on a ¼ hard neck will be twice that of a freshly annealed neck. If your rifle's chamber neck clearance is large, then you could easily get to the ¼ hard condition in 5 or 6 reloading cycles. It would take more cycles if your chamber neck is close fitting.
DANGEROUS TO ANNEAL THE CASE HEAD.... I have done a Finite Element Analysis of the 243 Win brass case for the full hard condition and in the annealed condition, if someone were to inadvertently anneal the case head. Here is a view of the brass deformations after a standard load has been fired that developed 55,000 psi. The annealed case head would most likely rupture and vent gas into the action and destroy your rifle. The calculation didn't allow for actual rupture, but allowed for the brass to stretch. But, you can see the deformations just before the brass ruptures. Notice how much the primer pocket expands. The red dots show the original un-deformed outline. A normal case head in the full hard condition is shown for comparison. For more information on the FEA model of the 243 Win brass, primer, barrel, and bolt face, click here.
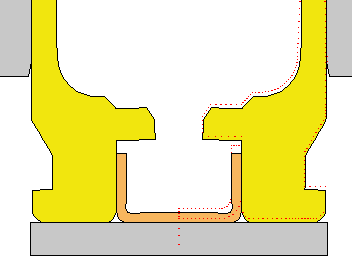 Full Hard 243 Win case head. View after a 55,000 pressure loading! This is a normal loading and a safe case head. |
|
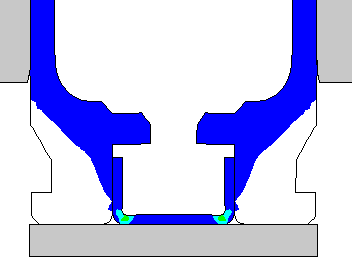 This view shows the plastic strain. There is very little plastic strain in the case head. |
|
Cartridge Brass (70% Cu - 30% Zn) Material Properties
| Material Name and Condition. | Density lb/in^3 |
Youngs Modulus msi |
Poisson's Ratio |
Yield Stress ksi |
Ultimate Stress ksi |
Elongation % |
Reduction in area % |
CTE per °F |
Yield Offset % |
| Cartridge Brass Cu.7 Zn.3 dead soft | 0.308 | 16.0 | 0.33 | 11.0 | 44.0 | 68.0 | - | 11.10 | 0.50 |
| Cartridge Brass Cu.7 Zn.3 annealed | 0.308 | 16.0 | 0.33 | 19.0 | 51.0 | 55.0 | - | 11.10 | 0.50 |
| Cartridge Brass Cu.7 Zn.3 1/4 hard | 0.308 | 16.0 | 0.33 | 40.0 | 54.0 | 43.0 | - | 11.10 | 0.50 |
| Cartridge Brass Cu.7 Zn.3 1/2 hard | 0.308 | 16.0 | 0.33 | 52.0 | 62.0 | 23.0 | - | 11.10 | 0.50 |
| Cartridge Brass Cu.7 Zn.3 H04 full hard | 0.308 | 16.0 | 0.33 | 63.0 | 76.0 | 8.0 | - | 11.10 | 0.50 |
| Cartridge Brass Cu.7 Zn.3 H06 ex hard | 0.308 | 16.0 | 0.33 | 65.0 | 86.0 | 5.0 | - | 11.10 | 0.50 |
BRASS AND STEEL ARE DIFFERENT.... To harden carbon steel, it
is heated and then
rapidly cooled or quenched. This
process locks the carbon in the crystal lattice and increases its
strength by
blocking crystal dislocations from easily advancing. To anneal steel,
it is heated and cooled slowly so the carbon atoms are stored "out of
the
way", so to speak.
ONLY WORK WILL HARDEN BRASS.... Cartridge brass is only hardened by cold working. The crystal dislocations caused by the cold working lock the crystal
lattice and make it harder and more difficult to form more dislocations thus increasing it strength. When
brass is heated, new crystals nucleate at the dislocations and the new crystals are small. If the brass is
quenched at this point, the brass retains the small crystals and is annealed with very few dislocations and is
stress free. This is the condition you want for your case necks. If the brass is slowly cooled, the small
crystals begin to coalesce and grow into larger crystals and the properties suffer because the large crystal
boundaries are not strong. Also stress corrosion cracking can more easily occur at the larger crystal
boundaries.
SPLIT NECKS.... Finally, the high stress with the hardened neck is what leads to split necks. It is
a process called stress corrosion cracking. Increasing the stress level increases the initiation of
cracks and crack propagation. Split necks are not hazardous, but they are a problem that can be prevented by
annealing. It is easy to just buy some new brass when you start to see some cracked necks and do all the case
prep on the new brass. If you mix old and new brass, your neck tensions will be different and this is
detrimental to good accuracy.

POLISH THE DIES.... I polish the inside of my rifle reloading dies. Most
die manufacturers leave the die bores smooth but not polished. A polished die will resize with much less axial
force than one in the as-received condition. I disassemble them and put a little Flitz on a cotton bore mop
held in a drill motor and polish each one for 30 seconds or more at a 300 to 600 rpm speed. Sometimes I have
to wrap a paper towel around the swab to get a good fit. Then I clean all the polish out with hot water and
dry with a paper towel wrapped around a clean cotton swab. The polishing process does not remove a measurable
amount of material, but results in smoother operation, minimizes the scratching or scoring of the brass, and
minimizes crumpling problems when I use them while forming wildcat brass.
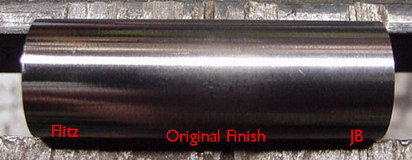
Flitz is slightly more aggressive than JB. I took a piece of mild steel with a reasonably smooth finish and polished it with Flitz and JB. The left end was polished for about 2 minutes at 500 rpm with Flitz and the right end for about 2 minutes with JB. There is no detectable decrease in the diameter on either end measured with my high-precision Mitutoyo Micrometer. It was a very easy test. Try it for yourself.
WHY POLISHED DIES HELP.... When you are resizing brass, there are combined forces
involved. In necking down a diameter, there is a radial force moving the metal toward the center and an axial
force, produced by friction, that tends to shorten the column length. For larger changes in diameter, the
radial force increases. Since the axial force is equal to the friction coefficient times the radial force, a
corresponding larger axial force is produced. High axial forces can crumple the brass when its critical
buckling load is exceeded.
How do you minimize the axial force? You can reduce the axial force by reducing the radial force when the
reduction in diameter is taken in smaller steps. But this takes a series of separate dies and costs more. If
you have only a few dies at your disposal, you can also reduce the axial force by reducing the friction
coefficient. The inside of the die can be polished with a metal polish like Flitz
and used in conjunction with a thin film of lubricant. This will greatly reduce the axial forces and minimize
possibility of buckled cases.
![]() NECK SIZING.... I achieve better
accuracy and case life by only neck sizing my brass instead of full length resizing for each reload. I usually
buy the 3 die sets that have a Full Length, Neck Size, and Seating die. Fire-forming your brass customizes it
for your rifle. When you fire a round in your rifle, the brass expands to fit your chamber. Then when the
pressure is relieved, it springs back elastically a small amount and is then customized to fit your chamber.
From then on, if you only neck size, about 3/4 or so of the neck, the reloads will fit your chamber much
better than new brass. Usually 3/4's or so of the neck gripping the bullet is sufficient to hold the bullet in
place, especially if you shoot varmints and load one round at a time. If you don't have the neck sizing die,
you can do almost the same thing with your full length die. Set the die so only about 1/2 of the neck is
resized. Because of the tapered case, very little full length resizing will occur. Jim Herbold had a good
idea. Leave your Full Length die set for full length sizing and use the 357 Magnum to .38 Special spacer ring
to back off the die for neck sizing. One disadvantage is when you only neck size, you cannot mix the ammo
between rifles of the same caliber. Also, for your hunting ammo, you should safely, try each round in your
rifle to make sure the bolt closes easily on it. For big game or dangerous game it may be safer to take the
reduced accuracy and full length resize all your brass.
NECK SIZING.... I achieve better
accuracy and case life by only neck sizing my brass instead of full length resizing for each reload. I usually
buy the 3 die sets that have a Full Length, Neck Size, and Seating die. Fire-forming your brass customizes it
for your rifle. When you fire a round in your rifle, the brass expands to fit your chamber. Then when the
pressure is relieved, it springs back elastically a small amount and is then customized to fit your chamber.
From then on, if you only neck size, about 3/4 or so of the neck, the reloads will fit your chamber much
better than new brass. Usually 3/4's or so of the neck gripping the bullet is sufficient to hold the bullet in
place, especially if you shoot varmints and load one round at a time. If you don't have the neck sizing die,
you can do almost the same thing with your full length die. Set the die so only about 1/2 of the neck is
resized. Because of the tapered case, very little full length resizing will occur. Jim Herbold had a good
idea. Leave your Full Length die set for full length sizing and use the 357 Magnum to .38 Special spacer ring
to back off the die for neck sizing. One disadvantage is when you only neck size, you cannot mix the ammo
between rifles of the same caliber. Also, for your hunting ammo, you should safely, try each round in your
rifle to make sure the bolt closes easily on it. For big game or dangerous game it may be safer to take the
reduced accuracy and full length resize all your brass.
COMPETITION SEATING DIE.... If you want a bullet seating die designed for straightness, the Redding Competition Seating Die is the way to go. This seating die has an internal cylinder that the case fits into with the bullet merely sitting on top of the case mouth. Then while you seat the bullet, the cylinder completely supports the case and holds the bullet in line as the seating plunger seats the bullet. The bullet is held straight, starts straight, and is seated straight. The tolerances on these dies are very closely held. The sliding cylinder fits the die so well, that if you tighten the set screw a little too hard on the locking ring, the cylinder will bind. I am partial to Redding dies for their precision and finely machined surfaces. Using these seating dies, the bullet run-out will be held to a minimum. The die also has a micrometer thimble on top so you can adjust the Over All Length (OAL) to within 0.001 inch.
PRIMER TO USE.... All primers are about the same except when loading the 17 calibers. There appears to be a very high pressure spike inside the primer for the three 17 calibers I reload. I have had problems and others have had similar problems with CCI and Winchester primers. I now use only Rem 7-½ Benchrest primers. These primers have the strongest primer cups that I have used and do not easily crater or worse, punch through. With the 17 Rem and the 17 Mach IV, I have had the Winchester primers either crater around the firing pin or leak at the outer edge through a tiny hole. Once this happens, it erodes a depression on the bolt face and then the problem only gets worse. I suggest use of only Rem 7-½ Benchrest primers when reloading for the 17's. See James Calhoon info on primers.
POLISHING MY CHAMBERS.... When I
got my 223 Ackley Improved Virgin
Valley (no longer in business) barrel, it had a very rough chamber. The
fired brass had marks I could see where it had been gripped by
the chamber and then slid backwards a tiny bit until stopped by the
bolt face. It looked almost sandblasted.
There were protruding primers on some of the fired rounds. When the
firing pin hits the primer, it pushes the
primer and the new case forward in the chamber. When ignition occurs,
the pressure expands the walls of the
brass. The rough chamber, with its high friction, grabs the case at the
forward position and the gas pressure
first pushes the primer back against the bolt face. As the pressure
builds, the brass case is stretched until
the case head is pushed back against the bolt or the case supports the
total load. If the case head is pushed
against the bolt face, it would produce a flat primer, but flush. If
the load is light, the case does not
stretch so much and leaves a gap between the case head and the bolt
face, but the primer is still against the
bolt face. This produces the protruding primers.
CONTROVERSY OR GOOD ENGINEERING.... Now some controversy. I
polish my chambers with
Flitz.
I don't want excessive friction between the brass and the chamber wall.
Some are going to argue with this, but
I have thought long about this. I have tried it and it works and is
good engineering. I polished the chamber
in my new Virgin Valley (no longer in business) barrel and it has made
quite an improvement. With a polished chamber, the friction
coefficient is much less between the brass and the polished stainless
steel chamber. The pressure is able to
force the case head against the bolt face before the case walls grab
the chamber. First, this lets the primer
(on the first shot with new brass) protrude, but be immediately
reseated in the primer pocket as the case head
is pushed back. The brass does not stretch nearly as much as it would
in a rough chamber. Now some will say
that a polished chamber will increase the force of the bolt face (frame
face on the Encore) and that is bad. WRONG!
That is faulty logic. The force is increased on the bolt face, but that is where it belongs. As all modern
rifles, the barrel and frame of the Encore are designed for strength. They are strong enough to support large
diameter Magnum-belted calibers. The force from the much smaller area of the .223 case head is easily
supported by the frame face. The brass case is designed to act as a bladder and encase the gas pressure.
Trying to use the weaker brass to lighten the load on the action and bolt face of a rifle by having the brass
grip the chamber is analogous to using a car's radiator to protect the bumper in a front-end collision. A
polished chamber minimizes case stretching, reduces case head separation, and increases case life. More
information on chamber finish here. To polish a chamber, I put Flitz on a cotton bore
mop and a piece of cleaning rod long enough to be held in a drill motor. I polish for about 30 seconds or more
at a 300 to 600 rpm speed. Sometimes I have to wrap a paper towel around the swab and put Flitz on it to get a
good fit. Be sure that the end of the bore mop's metal part is much smaller than the bore and covered so it
will not damage the rifling in front of the chamber.
FORMING 17 ACKLEY HORNET BRASS.... The 17 Ackley Hornet is formed from 22
Hornet brass. The first thing I do is remove the flash hole burr with my 22-caliber flash hole tool. See the
section on "Flash Hole". This only needs to be done once. It is not possible to do it with a
22-caliber tool after the neck diameter is reduced. Next, I uniform the primer pocket and then I chamfer the
neck ID and OD with a very light cut to remove the rolled over edge caused by the polishing process when the
brass was manufactured. I then neck turn the brass and, since my chamber has a "standard neck
diameter", I use the procedure described for "Factory chambers" to set the depth of cut. I neck
turn nearly all the way to the shoulder on the 22 Hornet brass. The end of the cut will land halfway up the
shoulder on the finished brass. This gives a uniform wall thickness at the junction of the neck and shoulder.
I prefer Winchester brass because it has thicker necks than Remington brass and will give a closer fitting
neck on the finished brass. ![]() NOTE:
It is important to polish the inside of all the forming dies with
Flitz
Metal Polish or equivalent. Rough dies will often crumple or fold the brass, where smooth
dies will not. The Flitz Metal Polish will not measurably change the dimensions of the dies.
NOTE:
It is important to polish the inside of all the forming dies with
Flitz
Metal Polish or equivalent. Rough dies will often crumple or fold the brass, where smooth
dies will not. The Flitz Metal Polish will not measurably change the dimensions of the dies.
|
|
DON'T FIRE FORM BRASS WITH A MUZZLE BRAKE.... Brady S. Clinger writes: The one thing you never want to do is to fire form a case with Bullseye, a cloth wad AND a muzzle break. I was fire forming some 7x57 Ackley Improved cases and blew out the end of the muzzle brake. As soon as the cloth leaves the barrel it opens up and hits the end of the muzzle break with tremendous force. After I removed the muzzle break the fire forming worked great. |
NECK SIZING DOWN IN SMALL STEPS.... The next operation is to spray a light coat of RCBS Case Slick spray lube on my case lube pad and rub it in and let it dry for a few minutes. I roll the cases on the pad to lightly lube them. Too much lube causes problems. Then I run the cases through the Redding 17 Ackley Hornet Form die and that decreases the neck diameter to about 0.220 inch. Next I run the cases through the 17 Ackley Hornet Trim die and that reduces the necks down to about 0.197 inch. For this process, you will need an extended shell holder, because the die is so short. You can skip the trim die, but if you have it available, it is better to reduce the neck diameter in as small as possible steps. I next anneal the necks with the process described on this page. See "Annealing Necks". The final forming I perform with the Full Length 17 Ackley Hornet die. I remove the expander ball and run the cases through the FL die. The brass can now be chambered for fire-forming, but NOT with a bullet.
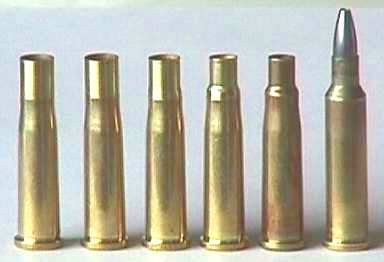 |
Neck turn nearly to the shoulder Resize in 22 Hornet die Neck size in 17 Ackley Hornet Form die Neck size in 17 Ackley Hornet Trim die Anneal and FL size in 17 Ackley Hornet die I don’t show a case after the fire form load 17 Ackley Hornet -- 20 gr. Berger MEF Moly |
FIRE FORMING WITHOUT A BULLET.... I prime the cases with any old odd lot of primers I have around the place and load 6 gr. of Bullseye with a tiny piece of paper towel or cotton wad stuffed in the end of the case to keep the powder from falling out. DO NOT load a bullet! I go outside where the noise won't bother anyone and I fire-form the cases. The 6 gr. of Bullseye will form the cases about 95% and not split any shoulders. The pressure produced by Bullseye with no bullet back-pressure is remarkable. It is truly a "fast" and energetic powder!
NECK SIZING WITH A FL DIE.... I don’t have a neck sizing die in 17 Ackley Hornet, so I set up the Full Length die so that it sizes about ½ of the neck. I neck size the cases and load about a case full of VihtaVuori Oy N-133 (approx. 12.5 gr.) and the 20 gr. Berger MEF Moly Coated bullets and go squirrel hunting. I recommend using Rem 7-½ primers. They have a stronger cup than the other brands. You won't get your best accuracy with this first loading but it will still be very good. After firing, the cases will be fully formed and the last process is to trim the case length. I don't trim off any more than necessary to clean up the neck ends all the way around. Then I remove the burr with the ID and OD chamfer tool followed by the steel wool smoothing. See "Neck Chamfering Tool". That’s it. The brass is finished and ready for reloading and shooting. With a case full of N-133 (approx. 12.5 gr.), the pressures are mild in my rifle and it burns extremely clean. I get about 3300 fps with the 20 gr. Berger bullets. I lightly tap the side of the case with a screwdriver while it is still under the powder measure to settle the powder in the case. Be sure and start with a lighter load and work up, looking for excessive pressure signs in your rifle. I am up to 20+ reloads on my brass and they are still going strong. If you load the 25 gr. bullets, you will have to back off on the load and work up to a good accurate load. The 25 gr. bullets perform better for me in the 17 Mach IV, but I still like the same 20 gr. Berger MEF in the 17 Mach IV too. One of these days, I will include a picture of the 17 Mach IV at each step in the forming process. I have found that a better load, for my 17 Ackley Hornet rifle, is the 20 gr V-Max bullet and about 12 gr of AA-1680.
Here are three groups shot with the 17 Ackley Hornet with the 20 gr. Berger MEF Moly bullets using the new Nikon scope. They are not benchrest quality, but will stay on a ground squirrel out to 200 yards if the wind is mild. The outside of the square aimpoint is 1 inch on a side.


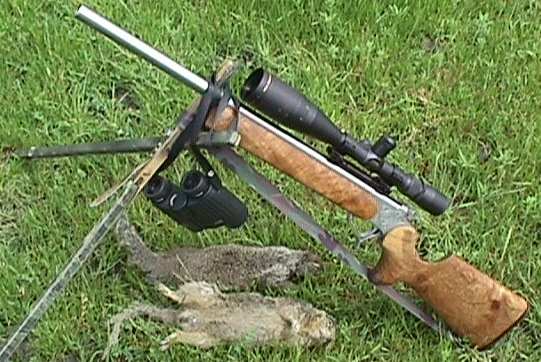
Here is a picture of the Contender Carbine in 17 Ackley Hornet, my binoculars, my Bi-Fur-Pod and a couple of nice ground squirrels.
FORMING 17 MACH IV BRASS.... I have formed hundreds 17 Mach IV brass from 223 military brass. The advantage is that the necks are thick and can be neck turned to better fit your chamber and the necks can be left longer than one can achive with 221 Rem brass. Here are the steps I have written down in my reloading manual. The inside of all the dies were polished with Flitz. Before I polished my dies, I had some crumpled cases. The cases were very lightly lubed with the RCBS lube and then lightly wiped clean with a towel.
This might seem a bit complicated, but it made some very good 17 Mach IV brass.
HOW NORM FORMS 17 MACH IV BRASS.... Forming 17Mach IV brass from 223 Rem brass. Does that make me an expert, not even close, but here's how I've done it and mine are really nice and shoot well too. The last batch which was 400 pieces came out excellent, in my opinion, here's exactly what I did. I started with once fired Winchester brass.
Was it a lot of work? Yep but I'll do it again when I need brass. That's why I made a huge amount at one time. I will add this, I've not loaded and shot all 400 of the last batch yet, just the first 100. They're really nice though and I have brass that is custom fitted to my chamber, I can seat 20 grain bullets at .005 away from the lands and have lots of bullet in the neck for good, consistent tension. Norman R Wisor Jr.
ENCORE 22-250 Imp/40º RIFLE.... Way back in September 1997, I ordered a 22-250 Imp/40º Match barrel for my Encore from Bullberry. It was to be 25-3/8 inch long full bull stainless steel with an integral muzzle brake. It arrived and everything was as ordered except it was NOT a Match neck chamber. The neck was supposed to be 0.243 inch dia and the chamber measures 0.2556 by my estimations. Well, I had waited so long, I decided to keep it and make the brass fit the chamber. Here is the saga:
The machine work on the barrel is excellent! The chamber is very smooth and the barrel fits my Encore frame perfectly. The Epoxy finished forearm and buttstock out of "utility wood" are beautiful. Too beautiful to paint camo!! I have developed a procedure to make the brass for it that are full length and "fitted-neck". It is too high a quality piece of gear to send back and go back into the waiting pattern for.
I fire formed about 35 brass today. When I drove into the field where I could use ground squirrels for fire forming, I saw a coyote right in the middle of a bunch of cows. I didn't trust the 22-250 Imp/40º yet and got out the trusty old Sako 243 and popped him at about 150 yards. The cows charged the coyote and I had him down, but he was not dead yet. I couldn't shoot again with the cows right there mauling him. I walked over and finished him off with the 22-250 Imp/40º. By the way, nowhere on my barrel or the dies is the word Ackley printed, so I don't know if it is the Ackley Improved, but I suspect it is very close to those dimensions.
There are about 30 ground squirrels that would have rather I sent the barrel back. It was shooting off a tad, but I could see the impact point and quickly got it right on with a few scope adjustments. Seeing the impact is a distinct advantage of the muzzle brake reducing recoil. By the way, I did like the BSA 6x-24x by 44mm scope at first!! Note: I have since replaced the original BSA scope with a Leupold 6.5x20 VariX III. The BSA would not maintain zero from trip to trip.
There is an unexpected problem with watching my point of impact. The recoil is extremely low due to the muzzle brake, but the pressure wave hits my face and makes me blink just at the critical moment!! I hadn't thought of the blink effect. This is my first muzzle brake. I concentrated better on the target and was able to overcome the blinking reflex after a while. All in all without having it on paper yet, the rifle works very well. It sure feels powerful compared to the 223's or 17 Mach IV's! I have since gotten used to the pressure wave and do not blink anymore. It only took a few times out with the 22-250 Imp/40º to overcome the blinking.
NOT FOR EVERYONE.... This is only for people who have too much time on their hands and like to tinker and fuss with their reloading. Here is my procedure for forming the 22-250 Imp/40º "fitted-neck" brass. It is a bit long-winded, but it will be interesting if you are into this sort of stuff.
FORMING 22-250 Imp/40º BRASS.... The rifle chamber neck was measured on a fire-formed 22-250 brass. The case neck measures 0.2543 inch neck. That is the spring-back position. The neck dimensions in the chamber must be about 0.0013 inch larger than that. My estimate of the chamber neck diameter is 0.2556 inch.
The measured chamber length is 1.9475 inch as new and unfired. After about 35 rounds it measures 1.9480 inch with the plug gauge from Sinclair. These lengths are for my chamber. Your chamber will be different and you should have no less than about 0.008 inch clearance for safety reasons.
THE BRASS.... I start with 243 Win brass (Winchester brand) so that I can get thicker and longer necks than I could with standard 22-250 brass.
THE TOOLS.... Below is the list of tools. NOTE: It is important to polish the inside of the three dies listed below with Flitz Metal Polish or equivalent. Rough dies will often crumple or fold the brass, where smooth dies will not. The Flitz Metal Polish will not measurably change the dimensions of the dies.
THE LUBE.... I use the RCBS CASE SLICK spray lube. I spray it on the lube pad and rub it in. I wait about 10 min for the solvent to evaporate. I roll the cases on the pad and wipe the neck and shoulder area with my fingers. Too much lube here and the neck or shoulder will develop grease grooves or dents.
BATCH OPERATION.... Do each of the following operations (on the complete batch of cases) in the order shown below:
Operation 1. Bump back the shoulder and resize the neck to 22 cal with the 22-250 Imp/40º trim die. Bump it back enough to just start a noticeable bulge at the junction of the shoulder and the case cylinder. Don’t worry about the slight bulge; it will straighten out on the next operation.
Operation 2. Use the 22-250 standard trim die and screw it down to allow about 0.100 inch of clearance between the die and the shell holder. Note: I crumpled a number of cases trying to go all the way in one operation.
Operation 3. Use the same 22-250 standard trim die and have it just touch the shell holder. Be sure and wipe the shoulder free of grease to prevent grease grooves. Hit this operation fast with the press. I had to polish the die ID with Flitz so this operation would not cause folding in the shoulder region.
Operation 4. Anneal the neck by holding the point of the 1 inch long center blue cone of the flame right at the junction of the shoulder and the case body. When the neck just begins to show red in a dark room, drop it into cold water. See the Annealing Procedure for more information on annealing.
Operation 5. Open the neck up with first the Sinclair Neck Turning double end expander die. Then follow with the carbide expander ball for a second opening operation.
Operation 6. Length trim to 1.970 inch the lathe. I Have to take off about 0.1 inch. The lathe makes it easy. Use the collet to hold the brass centered and the same distance on a shoulder for each piece of brass. There is a picture of this on the Mini Lathe Page, but any case trimmer will work.
Operation 7. Lightly chamfer the neck ID and OD and run through the 22-250 Imp/40º full length die. Use the carbide expander ball. It will cause a slight bulge at the shoulder that decreases the amount of neck shorting on fire forming.
Operation 8. Neck turn (using the Marquart tool) to 0.2548 inch OD using the carbide mandrel. Measure without the mandrel in place. Neck turn all the way to the junction with the shoulder.
Operation 9. Length trim to 1.948 inch with the hand tool.
Operation 10. Chamfer ID and OD with the chamfer tool. Then use the Steel Wool Spinner to smooth the neck ID and OD chamfer.
Operation 11. Load 40 gr. Nosler BT's Moly coated with 33 gr. H322 for a fire-forming load. With the muzzle break it really works well on ground squirrels and it FEELS POWERFUL compared to the 17 Mach IV!! It also exhibits G.S. loft!
Operation 12. After fire forming, I open necks with the carbide expander-ball, trim the lengths to 1.940 inch and chamfer ID and OD, and do the Steel Wool Smoothing process. After firing, the lengths range from 1.945 inch to ~1.942 inch. This will give a 0.008 inch gap the bullet must jump across.
Finally, I uniform the primer pocket and de-burr the flash hole and that is it! The brass is done. More to follow as I find out more about the brass. Note, these are "fitted-neck" cases and do not need to be resized or neck sized as long as reasonable loads are used. Merely de-prime, clean the primer pocket and re-prime. Then clean the neck ID and charge with powder and seat the bullet. Making this type of brass is difficult, but reloading is a snap!!
I checked a load of 38 gr. Varget and 40 gr. Nosler Ballistic Tip and no pressure signs. Got one ground squirrel at an estimated range of 320 yards. I need one of the range finders to keep me more honest! ;-)
![]() FAVORITE POWDERS.... I
don't want to recommend any specific loads. I believe you will achieve better reloads, in your rifle, by
starting with the minimum charge and working up to an accurate load. I do have some favorite powders that have
worked very well for me in several different rifle calibers and here is my list:
FAVORITE POWDERS.... I
don't want to recommend any specific loads. I believe you will achieve better reloads, in your rifle, by
starting with the minimum charge and working up to an accurate load. I do have some favorite powders that have
worked very well for me in several different rifle calibers and here is my list:
17 Ackley Hornet.. Accurate AA1680 and VihtaVuori Oy N-133
17 Mach IV........ Accurate 2015BR and Hodgdon H322
22 K-Hornet....... Hodgdon H110
221 Rem Fireball.. Accurate AA1680
223 Rem........... Hodgdon H322 and Winchester W748
223 Ackley Imp.... Hodgdon H322
22-250 Ackley Imp. Hodgdon Varget
243 Win........... Hodgdon H414 and H4831
7 mm Rem Mag...... Hodgdon H4831
SOME OF THE CALIBERS I RELOAD.... Here is a picture of some of the calibers that I reload. It pretty well covers the spectrum of small varmint calibers. My first 17 caliber was a Rem 700 BDL in 17 Rem and it was so much fun to work with, that I had to have the 17 Ackley Hornet and the 17 Mach IV. The workhorse caliber is the 223 Rem and it can be improved some by going to the 23/40 with a straight case and 40° shoulder. The 22-250 Imp/40° easily gets the velocities up to the 4000 fps range. My 243 Ackley Improved is on a Mauser action that is nearly 40+ years old. It shoots very well, but most of the time it is just too much for ground squirrels. Then again, I have used the 7 mm Rem Magnum on ground squirrels a few times just for effect!
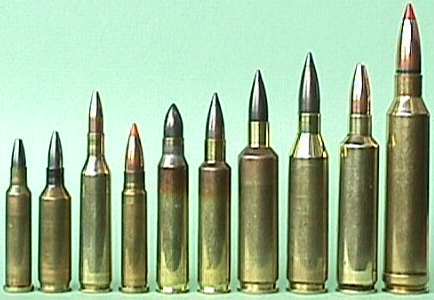 |
17 Ackley Hornet -- 20 gr. Berger MEF Moly 17 Mach IV -- 20 gr. Berger Moly 17 Rem -- 25 gr. Hornady 22 K-Hornet -- 40 gr. Nosler Ballistic Tip 223 Rem -- 33 gr. Hornady V-Max Moly 23/40 -- 40 gr. Nosler Ballistic Tip Moly 22-250 Imp/40° -- 40 gr. Nosler Ballistic Tip Moly 243 Win -- 95 gr. Nosler Ballistic Tip Moly 243 Ackley Improved -- 60 gr. Sierra HP 7mm Rem Mag -- 150 gr. Nosler Ballistic Tip |
Notice that I only neck size about ½ of the neck length on the first five. I use single shots and this is sufficient neck sizing to hold the bullet in place for single loading. The 23/40, 22-250 Imp/40°, and 243 Win are fitted necks and no neck sizing is required. The last two are for factory chambers and require neck sizing. You can still see the evidence of the neck anneal on the middle four. It is also obvious that I don’t polish my brass in a tumbler.
COMPRESSED LOAD--MAYBE NOT.... If you are using one of the slower burning powders that fills the case and end up with a compressed load that shoots the best, it might not really be a compressed load. Here is a trick to get two pounds into a one pound bag. Don't use a loading block when you charge the cases with powder. Merely hold the case in your fingers under the powder measure. After throwing the charge, continue to hold the brass with the neck still in the drop tube and tap the side of the brass lightly with the shaft of a small screwdriver eight to ten times. You will find that the tapping will settle the powder an 1/8 inch or more and maybe enough so it won't be a compressed load after all. It works much better than the long drop tubes, but takes a little extra time. Try the experiment below.
DO THIS EXPERIMENT.... To see how the tapping technique can compact powder, do this simple experiment. Take a case and set it up in a bowl to collect the excess power. Then place a funnel over the case mouth and with a spoon fill the case, until it is over full, with the powder you want to test. Then lift off the funnel and wipe across the top of the neck to remove the heaped up powder. Put the funnel back on the case mouth and pick up the case and funnel and lightly tap the side of the case eight to ten times with the screwdriver shaft. Remove the funnel and see how far down the powder has settled.
![]()
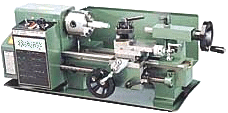 MINI LATHE.... I
have recently purchased a Mini Lathe for my reloading bench. It has a 7 inch swing and is 10 inch between
centers and only takes up 24 inches of space on the reloading bench. It is small, but has a 0.813 inch hole in
the headstock and will do some barrel work on smaller diameter barrels. Click here for
more information on the Mini Lathe, including the tooling and pictures.
![]()
Case Head Expansion vs Peak Chamber Pressure
CASE HEAD EXPANSION.... Some reloaders measure the expansion of the unsupported area of the case head with a micrometer. This allows them to determine the maximum load for a particular bullet and powder combination in their rifle. I used the Model 7 action with the 243 Win caliber brass to calculate case head expansion for increases in peak chamber pressure.
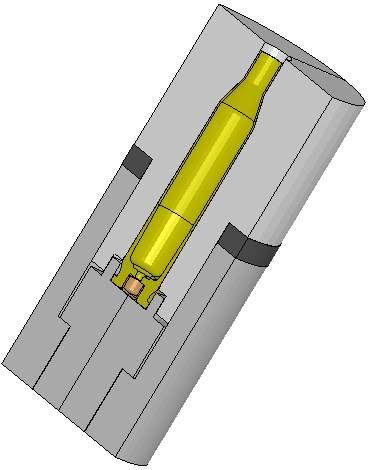
LS-DYNA 3D model of the Remington Model 7 action and the 243 Winchester caliber.
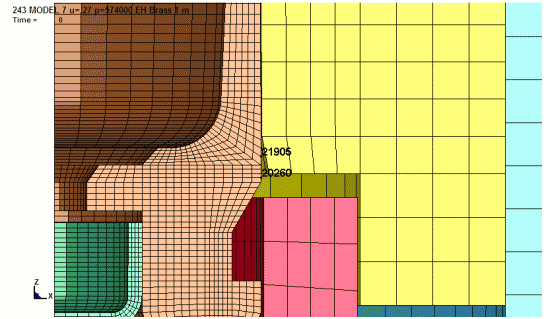
NODES SELECTED TO PLOT.... To determine the amount of permanent case head expansion, node 21905 was selected
and the increase in diameter at this location is plotted. The plots show the
case head expansion during firing and finally, the permanent increase in
diameter after firing. The location at node
20260 typically has about 0.0005" less expansion.
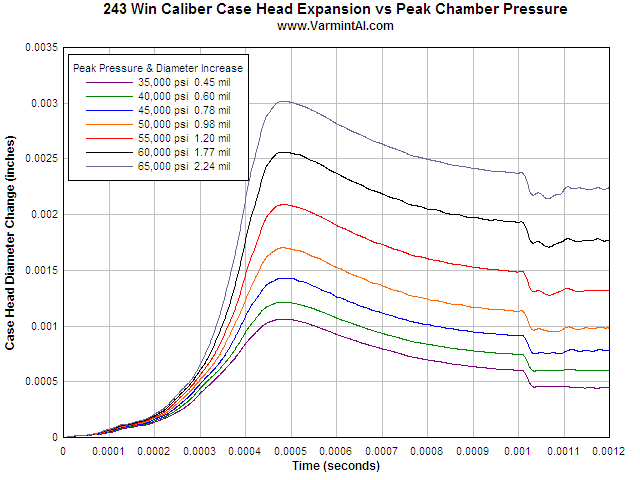
CHANGE IN DIAMETER.... This plot shows the case head diameter increase as the pressure rises and then
the spring back as the pressure falls off to zero. The permanent diameter
increase is at the final time when the pressure is zero and the contact surfaces
are removed to simulate a free standing piece of brass. The conditions of this
series of calculations were as follows:
MORE DETAILS.... See the complete Remington Model 7 analysis here.
![]()
ENGINEERING.... Here is an example 3D Finite Element Analysis result of a Stolle Panda benchrest rifle action and bolt using John Hallquist's NIKE3D Finite Element Code. The stress levels for the 6-PPC caliber bolt face are displayed (red is the highest stress level). There are more details on my Engineering Page and examples of other calculations.
![]()

![]() MY DREAM RIFLE.... This is my Stolle Panda in 23/40
built by Kelbly. It is an extremely well built, no compromise, rifle with its fluted bolt, fluted stainless
steel barrel plus the beautifully finished benchrest thumbhole stock. The machine work, fit and finish are
perfect. It is built like a fine Swiss watch and is as smooth as silk. It just "feels good" to open
and close the bolt. The trigger is a Jewell Trigger at about 4 ounces. I increased the resolution on the
picture so you can better appreciate these fine qualities and dream. Note: NO camo paint here!!!
MY DREAM RIFLE.... This is my Stolle Panda in 23/40
built by Kelbly. It is an extremely well built, no compromise, rifle with its fluted bolt, fluted stainless
steel barrel plus the beautifully finished benchrest thumbhole stock. The machine work, fit and finish are
perfect. It is built like a fine Swiss watch and is as smooth as silk. It just "feels good" to open
and close the bolt. The trigger is a Jewell Trigger at about 4 ounces. I increased the resolution on the
picture so you can better appreciate these fine qualities and dream. Note: NO camo paint here!!!
NEW SCOPE.... I had just mounted one of the new Sightron 4-16x42 Stainless Steel scopes on the rifle and the scope seems to also work very well after one day of testing. The Sightron scope has a 1/2-minute dot reticule with very fine crosshairs and 1/8-minute click adjustments. I generated the target with AutoSketch. It works better with the dot reticule than the standard benchrest targets. It is easier for me to center the dot in the white circle than in a white square. The actual size of the square is 1 inch on a side.
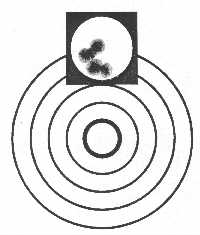
GROUP IN LOW 3'S.... Here is a 100-yard 5 shot group using bullets sprayed with the "Ms Moly" Molybdenum Disulfide coating. The load for the 23/40 (a straight-cased 223 with a 40° shoulder) was the 40 gr. Nosler Ballistic Tip bullets and my standard load of 25.3 gr. of H322, giving a velocity of approximately 3500 fps. The group, in the low 3's, is not exceptional, but not bad either. It was fired after about 40 rounds through the barrel, all with Moly-coated bullets and no cleaning. This accuracy level is good enough for most ground squirrel shooting. I later fired another 30 Moly-coated rounds through the barrel at ground squirrels. When I cleaned it, there was no evidence of copper in the barrel after 70 rounds. So far, it looks like the "Ms Moly" works very well.
HOW TO APPLY Ms MOLY.... The spray-on Ms Moly is probably not as good as the Moly coating applied by the complicated Neco technique. But, it works very well in spite of the ease of application. I have used it on about 1000 bullets so far and it has essentially stopped copper fouling. I found that it sticks best to jacked bullets if I preheat them with a hair drier first. So you won't blow the bullets over, when you first direct it toward the bullets, put your hand over the intake of the hair drier to reduce the flow. Once you are directly over them and blowing downward, you can remove your hand and allow the full flow and the bullets will still stand up. After about 1.5 minutes of heating I immediately spray them from four sides. Then another two minutes with the hair drier. I let them set for about 20 minutes and finally put them back in the boxes. The coating is still soft for about a day. It is best if you wait a day or so before you load them.
HOW TO GET Ms MOLY.... A number of people have asked me where you get Ms Moly. The phone number is 800-264-4140. For about $30 you get two 16-ounce spray cans and two foam templates to help you stand up the bullets for spraying.
MIDWAY MOLY.... I got the Midway Moly kit with the 1292 Tumbler, two extra bowls and 8 ounces of Moly powder. I put it on the shelf because I had plenty of coated bullets that Dick was so gracious to process for me with his Neco kit. Since I was running low on coated bullets, I got the Midway kit out and first checked to find out if the tumbler was not subject to the recall for overheating and it was the new model. I got two plastic vitamin pill bottles (250 ml size with plastic lids) and put about 350 each of the 40 gr. Nosler BT bullets in each bottle. I used two pill bottles so that the bowl would be somewhat balanced. I added a heaping screwdriver load (approximately 1/4 of a teaspoon) of Moly to each pill bottle. I put the tumbler in the other room and fired it up. After 90 minutes, I shut it off and opened one of the pill bottles. The bullets were very well coated. I poured out the bullets on a shop rag and rubbed most of the extra Moly powder off and put the bullets back in the boxes. I don't know how it could be any easier to do and it works very well. I used no steel balls and didn't clean the bullets. I just put the pill bottles in the tumbler bowl without any medium. Next time I will use some medium in the bowl because I could see wear spots on the bowl caused by the bottles. I checked a number of the bullets and I can't wipe off the Moly coating.
![]() A STUPID
CORROSION TEST.... A few months ago, I got castigated for doing a "stupid test" on the
corrosion of steel by Moly and water. I still have the info and will post it here. You don't have to believe
it or agree with me but, if you are interested, you can easily repeat the test to see if you get the same
results.
A STUPID
CORROSION TEST.... A few months ago, I got castigated for doing a "stupid test" on the
corrosion of steel by Moly and water. I still have the info and will post it here. You don't have to believe
it or agree with me but, if you are interested, you can easily repeat the test to see if you get the same
results.
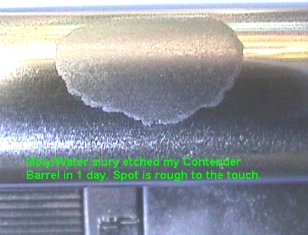
MOLY/WATER AND CORROSION.... I have performed a Moly/Water Slurry corrosion test on one of my Contender carbine barrels. The picture shows the etched spot on the underside of the barrel just forward of the forearm hanger. I sanded the bluing off of the area and placed the mixture on the spot and waited 1 day. The surface was etched and is rough to the touch. When I get a chance, I will try to measure the surface height with a dial indicator. I am not sure if I have the accuracy with my cheap indicator to do the job. You can test any barrel that you might be concerned about to see if there could be a problem. I would suggest that if you shoot Moly bullets in a regular Chrome-Moly (4140) steel barrel in wet weather, that you clean and oil the barrel the first chance you get. A similar test on my Encore 22-250 Imp/40° stainless steel barrel showed no corrosion attack at all.
CONDENSED MOISTURE.... I did another test to simulate a cold rifle being carried into a warm
room. I took my piece of mild steel and machined a new surface and polished it. Then I put some powdered Moly
on a piece of paper and rubbed the steel on the Moly powder until it was well coated. I took a cloth and wiped
vigorously all the Moly off I could, but it was still well coated and shiny Moly. I left the piece of steel
for one week and it stayed as shiny Moly as at first. No corrosion or attack of any kind. Next, I put the
piece of steel in the freezer for 30 minute and than took it out and let it set in open air. A thin layer of
moisture condensed on the steel. Two hours later it was etched where the Moly shiny surface was and also rust
was present. (On earlier tests with the Moly/water slurry, there was NO rust. I suspect that there was
sulfuric acid present that dissolved the iron oxide to form iron sulfate and no brown rust was evident at
all.) So the condensed moisture on the Moly caused both etching and then it proceeded to rust the steel. There
was not enough sulfuric acid IMHO to convert the rust to iron sulfate. (This is speculation.) Another very
important part of the condensed moisture test was that the areas not coated by the Moly showed no rust or any
other corrosion attack by the thin layer of moisture.
Remember, that if you have stainless steel barrels, there are none of these corrosion problems. In my book, it
sure makes me want to buy only stainless steel barrels from now on, not only because they last longer, but
because of their resistance to corrosion.
KROIL PROTECTS THE STEEL.... I performed another test. I used the same piece of mild steel
and machined a fresh surface. I rubbed in the Moly and after a few hours, rubbed it with a cloth wetted with
Kroil to simulate a cleaning patch going through the barrel. I rubbed it dry with a second cloth. I let this
set for another few hours and then I put the steel in the freezer for 30 minutes and removed it to the room.
Moisture condensed on the surface. The Kroil-treated Moly surface did NOT rust or etch. It appears that the
Kroil prevents the condensed moisture from attacking the Moly/steel surface. This needs more testing, but it
appears that cleaning a blued steel barrel with patch wet with Kroil would protect the barrel in cold or wet
weather from the Moly/Water corrosion problems. There are probably other oils and cleaning agents that would
also work as well as Kroil, but I had it available for testing. Also, the ammonia and the basic nature of
Sweet's 7.62 would probably neutralize any acid effects of the Moly/Water combination.
FIVE POINTS TO CONSIDER.... Here are the five points that can be made about
this set of crude experiments:
Point 1. Stainless steel (416) is not attacked, corroded, or etched with a mixture of Moly
and tap water applied directly to an unprotected surface in 24 hours.
Point 2. If one has a stainless steel barrel and shoots Moly-coated bullets
and shoots in wet or cold weather, there is probably not a corrosion concern with that barrel even though
small amounts of water could come in contact with the Moly in the barrel.
Point 3. Chrome-Moly (4140) steel is attacked and etched with a mixture of Moly and tap water
in as little time as one day and probably less. The etched surface is rough to the touch and is not a surface
I would want in the bore of any of my rifle barrels.
Point 4. If one has a Chrome-Moly (4140) steel barrel and shoots Moly-coated bullets and
shoots in cold or wet weather, there could be a problem with corrosion if moisture condenses on the Moly
surface. If you have a concern, you can easily test your own barrel steel on a small area somewhere hidden on
the bottom side to see if there is actually a corrosion problem.
Point 5. If you are shooting a Chrome-Moly (4140) steel barrel and
Moly-coated bullets in cold and/or wet weather, you should clean and oil the barrel right after you return
from the range.
I SHOOT MOLY-COATED BULLETS.... I shoot Moly-coated bullets and will continue to do so. They
are great and shoot very well without cleaning after a few shots. This is very important in the small calibers
like the 17's. I used to have to clean to preserve accuracy after 20 or so rounds, but can now, in most cases,
shoot five times that many rounds before a noticeable reduction in accuracy occurs. I sure am going to clean
and oil my blued steel barrel after shooting Moly bullets in wet or cold weather. I don't own any Moly stock
and am not being paid by any Moly company, nor have I been given any free samples. I hope I am not frightening
anyone into not using Moly-coated bullets. They work very well for me and I will continue to use them. If I
help prevent someone from ruining a barrel by neglecting it after a wet weather hunt, then that is a plus.
That's my payoff. Good Moly Bullets from Varmint Al.

![]() WAC.... Here is my
favorite single frame from Dilbert. Mary Ann pasted this on the bathroom mirror for me years ago. I'm WAC
positive.
WAC.... Here is my
favorite single frame from Dilbert. Mary Ann pasted this on the bathroom mirror for me years ago. I'm WAC
positive.
![]()
![]()
The serious benchrest shooter and varmint hunter knows that a clean barrel is essential to achieving both precision and accuracy. The benchrest shooter will often vigorously scrub a barrel with all sorts of potions after as few as 10 shots to assure his gun will precisely place shot after shot in the same spot. The varmint hunter, on a good day, may not be able to clean so often and will see accuracy significantly deteriorate as copper builds up in his barrel in shot after shot. In my Thompson Contender Carbine with a 17 Mach IV Bullberry barrel, I find that ½-inch groups at a 100 yards open up to over 1 inch after as few as 25 shots. A thorough cleaning that removes all traces of copper brings back the small groups. Obviously, if one could stop the copper deposition, the loss of precision would go away.
The good people at Nostalgia Enterprises Company NECO in Benicia, CA (see info below) studied this problem and developed a process whereby the well-known lubricant molybdenum disulfide (Moly) could be mechanically "plated" onto a bullet. With a properly Moly-coated bullet, the galling of the copper alloy bullet jacket with a steel barrel is essentially eliminated along with the necessity to clean every few rounds to maintain shooting precision. My 17 Mach IV will easily go 50 rounds or more with no loss in precision or accuracy when I use Moly-coated bullets.
NECO
536C Stone Road
Benicia, CA 94510
Phone 707-747-0897
Fax 707-747-0898
The NECO process is centered around using a tumbler-type case polisher and small, stainless steel balls and very, very finely divided Moly. Bullets are cleaned using corncob polishing medium (Not walnut. That leaves an oily coating.) and then allowing the tumbling action of the stainless balls to impact impregnate the Moly into the bullet’s copper alloy jacket. Powdered molybdenum disulfide is a black, messy material and will get all over everything including your fingers during the reloading process. Hence NECO recommends a slight coating of carnuba wax to cut down on the mess, again using steel balls as the mechanism to do the coating. (NECO offers a kit with all the necessary materials to do your own coating.)
Rotary tumblers are expensive and many of us have chosen to use instead vibratory polishers, such as the Midway Model 1292. NECO states that the vibratory polishers will work as well as the tumbler type, but tend to take longer. I personally struggled with vibrator-type polishers as a Moly-coating device and found, following the NECO instructions, it often took up to 8 hours to do a good Moly-coating job. Then in the June 1997 issue of Precision Shooting magazine, Mr. Dave Beisner published an article offering a modified approach using vibrator machines. I have followed his approach many times now and it works very well. (Thank you Mr. Beisner!) The following summarizes his process:
There are three basic steps to the Moly-coating process. One, clean the bullets of the oils and grease used in the manufacturing process. Two, mechanically impregnate the bullets with Moly. And three, apply a thin coat of carnuba wax. For the process to work properly, CLEANLINESS is ESSENTIAL! Separate polishing bowls must be used for each of the three steps; a separate strainer and pan must be used between the initial bullet cleaning and the Moly-coating step. Do not touch the bullets with your hands between steps.
Step One: Put about 2-3 cups of untreated corn-cob polishing medium in one of the bowls and mark that bowl for cleaning only. Add up to about 8,000 grains of bullets. (Mr. Beisner says to keep the amount of bullets to under 5000 grains, but I have had good success with nearly twice the amount.) Vibrate for 20 minutes. Pour the bullet/corncob mixture through a strainer (I found a steel mesh cooking strainer at Wal-Mart that is just perfect.) into a clean plastic pan. (I use an inexpensive dishpan.) The corncob goes back in its marked bowl and the bullets on to:
Step Two: Load about 3 pounds (a little more than half of a NECO bottle) of the steel balls into a new bowl (mark the bowl) along with about one teaspoon of Moly and run the vibrator for some 20 minutes the first time to coat everything. Now add the clean bullets from Step One. ( I usually just leave them in the strainer so I don’t touch them.) Vibrate for an hour and a half. Check that you have a good, uniform coat of Moly. Use a paper towel to pick up one of the bullets and rub the surface with the towel. You should not be able to remove the coating with a few rubs. For future coating add only a very small amount of Moly (generally less than a quarter teaspoon). Strain out the balls with a separate strainer into a different plastic pan.
Step Three: Load a third bowl with about 3 cups of corncob medium and a teaspoon of carnuba wax. Run this mixture for about 20 minutes without the bullets the first time to coat everything. Now add the bullets and run for another 20 minutes. Strain out the corncob (you can use the same post Moly-coating strainer/pan combination) and you are done! If you wish to wipe the corncob dust off, dump the bullets on a terry cloth towel (not your good ones!) and gently roll the bullets around until clean.
Moly-coated bullets are obviously lubricated and hence you may notice slightly less force is required to seat the bullets in the cartridge case.
There have been some claims that Moly-coating actually improves the precision of your shooting over that of the original clean barrel. An interesting theory has been proposed for this. In the normal state of affairs, the copper alloy bullet jacket galls as it passes down a barrel. This tearing of the metal leaves slight, non-uniform "tails" or "fins" of metal extending beyond the base of the bullet. These "fins" cause the bullet to wobble slightly until spin allows the bullet to stabilize or "go to sleep". With the Moly lubricated bullet, galling does not take place and the copper alloy is extruded around the barrel lands and no "fins" are developed. Hence the bullet stabilizes or "goes to sleep" earlier and yields increased precision. The degree to which this happens, obviously will depend upon the individual barrel/bullet situation.
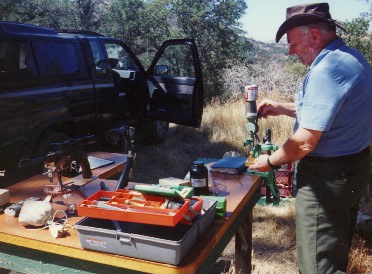 Here is Dick loading Moly-coated bullets at the range.
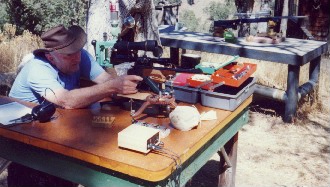 Here is Dick sighting with his Contender Pistol in 222 Rem.
The 100-yard range at my cabin is a TWO benchrest range! Dick's benchrest is made of wood; my benchrest in the
background is made of steel and concrete.
Velocity Change With Moly-coated Bullets Vs Moly-coated Barrel
by Dick Hatfield, July 14, 1998
Recently I became aware of a product called Spica Gold manufactured by the Parsec Group in Columbia, South Carolina. (Note: This product is now available as "Plate+" from Sprinco, USA, the authorized distributor for shooter materials from Parsec. Any questions or comments should be directed to Sprinco not Parsec.) This product is a colloidal suspension of extremely finely divided (less than 0.5 microns) Molybdenum Disulfide, or "Moly", in a light oil with various proprietary inhibitors. According to Parsec/Sprinco, one could use the product to coat the inside of a gun barrel and increase the corrosion resistance of the barrel and not have to use Moly-coated bullets to get the benefits of reduced galling or copper deposition. Being able to coat the barrel offered the chance to compare various combinations of bare and coated barrels and bare and coated bullets.
I have a sporterized Model 1903 Springfield with the original military 30’06 barrel (well used) that had never had Moly-coated bullets fired in it. Although not an accurate gun, it would work nicely for a set of velocity experiments. I cleaned the barrel thoroughly with a chemical copper remover (Barnes C-10) until there was no sign of copper and followed this with JB (a very, very mild abrasive) and finally a fine polishing compound used on plastics.
I then loaded up 100 rounds using military brass, Remington 150 gr. soft points and H414 powder with a load that had worked well in the past. All 100 rounds were as alike as possible. Fifty of the bullets were Moly-coated using the NECO tumbling process. The bullets were 0.065 inch from touching the lands in order to keep the overall length short enough to feed through the magazine.
The experiment first consisted of firing 25 rounds of noncoated bullets through the clean barrel. As expected, there was considerable evidence of copper in the bore. I again cleaned the barrel of all signs of copper using the above process. I then fired 25 rounds of Moly-coated bullets. There was some copper on the lands following the firing, but not nearly as much as with the bare bullets. (Remember, this is a rough, used, military barrel. A modern, lapped barrel would probably show no copper.) Cleaning was easier and followed the above procedure until there was no copper. The barrel also had no apparent sign of Moly, as it appeared shiny like fresh steel.
Following the Parsec/Sprinco instructions, I corked the barrel, filled it and soaked it in Spica Gold/Plate+ for 5 days (48 to 72 hours recommended) then cleaned with a few dry patches. I observed a dull gray coating on the bore. I then fired 25 rounds of bare bullets in the Moly-coated barrel. I observed some copper fouling on the lands. I judge that it was about the same as that following the Moly-coated bullet firing. I then ran a few patches through the barrel and made no attempt to clean it.
The last test was with Moly-coated bullets in the Moly-coated barrel. Again there was some copper fouling, some of which was left over from the previous test. But I couldn’t see particularly more than before. The velocity (in feet per second and the group sizes are in inches) results were as follows:
|
Test |
Bullet |
Barrel |
High Velocity |
Low Velocity |
Mean Velocity |
Max Spread |
Std Dev |
Group Size |
|
1 |
Bare |
Bare |
2777 |
2719 |
2747 |
58 |
13 |
3.8 |
|
2 |
Moly |
Bare |
2735 |
2665 |
2701 |
70 |
19 |
3.4 |
|
3 |
Bare |
Moly |
2819 |
2773 |
2789 |
46 |
13 |
4.7 |
|
4 |
Moly |
Moly |
2796 |
2726 |
2753 |
70 |
18 |
4.2 |
Conclusion.... Moly-coated bullets do cause the velocity to drop as reported in the literature. A Moly-coated barrel will give increased velocity as reported by the Parsec/Sprinco. A combination of the two cancels and gives essentially the same results as no Moly at all. Note that the standard deviation for Moly-coated bullets was over 45% greater than with bare bullets. I don’t understand why. There was no apparent effect on group size, but this is no benchrest gun either. How long will the coating on the barrel last? I don’t know. Parsec/Sprinco suggest running a patch with the Spica Gold/Plate+ through the barrel after each firing string, i.e., when you would normally clean it, and you should get 500 to 1000 rounds before a re-soak is needed. We will see. Frankly, coating the barrel seems to have some advantages: no fuss with Moly-coated bullets, a slight gain in velocity, and a corrosion-resistant coating in the barrel.
I have done some reading of the scientific literature on Moly and there is repeated evidence that Molybdenum Disulfide plus water (in the air) plus oxygen (also in the air) will yield a bit of sulfuric acid, which is not good on either your bullets or your barrel. I would like to see some more experimenting along the lines of the above. If you are interested in such experiments, contact Sprinco USA, Inc., in Chandler, Arizona (www.sprinco.com or 800-397-9530), who now offers small amounts of Plate+ for the shooter.
Happy shooting with Moly-coated bullets or Moly-coated barrels or both! For more info, send email to Dick Hatfield.

![]()
Last Updated: 07/18/2015
End of Page![]()